Creating a Logic Template
![]()
![]()
|
Creating a Logic Template |
|
|
|
|
After selecting Logic Template from the Create New File dialog box the Logic Template Identity dialog box appears:
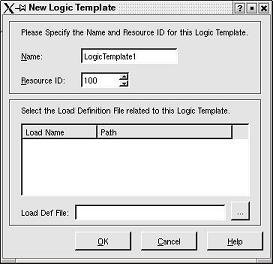
Use the Logic Template Identity Dialog Box to define a unique name, resource id and related load definition file.
Load definition files that exist in the active project are listed in the selection box along with their paths. If the load definition file that is to be related to the logic template being created does not appear in the selection box, choose the ellipse (...) button to locate the load definition file on the local file system.
The load definition file contains information such as data field names, data types and index names and types that will be used in the logic template.
A related load definition file is not required, but the majority of commands in the logic template editor will be disabled if one is not chosen.
After defining the name, resource id and related load definition file click the OK button to create the new logic template. Note: These settings can be changed at anytime after the logic template has been created. Simply select the Edit menu and choose Logic Name... to display this dialog box and edit these settings.

The new logic template has now been created with the default name NONAME1.
The task bars along the left side of the logic template editor allow you to select commands to be added to the logic template. Simply place the cursor in the logic template editor where you would like the command to be inserted, select the command, fill in the arguments for the particular command and it will be inserted into the logic template. Some of the commands will not be enabled due to their dependancies on either data fields or indexes defined in the related load definition file.
The tree along the right side of the logic template editor displays the data fields and indexes defined in the related load definition file if it exists.
The panel along the bottom of the logic template editor displays the error messages or warnings for the particular logic template when a check is done. A check can be done by either pressing the F9 key or selecting the Check->Error Check menu item.
The menus at the top of the logic template editor allow you to save the file, edit settings and search.
You will also notice the new file has been added to the Project Manager. The entry will not have a path specified until the file has been saved.

After you have created the logic template, the next step would be to edit the file.
|
|
|

